Step 1
Register your site and verify it
This is a simple process. Don't tell me you don't know how to register a new account on a website.... -.- Go here-> http://www.commentluv.com/wp-login.php?action=register to register new account on commentluv.com.
Fill out the necessary fields, and continue. You will be told that a confirmation email has been sent to your mailbox. Check it and click link embedded in it to activate your account.
Next, you have to add commentluv tag to verify your site. Go here:
 http://www.commentluv.com/settings/ , and fill out your site address. You will have to put html code (below badges display) like provided on this pic, on your blog. Just add a new page element (Javascript) and paste the whole code there.
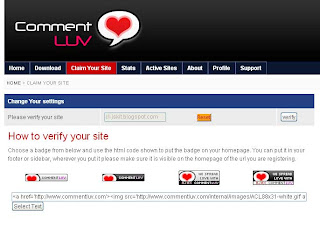 Once you have inserted the code, click 'verify' to claim your site. The verifying phase now is done.
Step 2
Import your comments and convert your blogger template
Go here: http://js-kit.com/comments/blogger.cgi .
 Again, it's a javascript based website, so disable your NoScript if you have it installed in Firefox/ add an exception for this website.
 Fill out the fields on 'Step 1: Importing Your Comments.' Blog URL should be filled with your blog's URL, Ex: eternalblackzero.blogspot.com, Account should be filled with YOUR BLOGSPOT EMAIL ADDRESS that you use regularly to login to your blog. And finally, Password is your blogspot email address password. Click import button and wait, confirmation screen should appear in a minute or so, depending on your connection speed.
Then, please follow instructions posted on 'Step 2' carefully.
If you have followed everything correctly, after you had finished 'Step 2' on js-kit.com, your blog's comment form should've been changed by now. Please refresh your browser if you haven't seen the difference.
 Step 3
View the commentluv code
Go back to commentluv.com to get your code now. The code is located here: http://www.commentluv.com/download/blogger-commentluv/ .
 You HAVE to click 'Click for your code' and small text box will appear there. Copy the whole text and switch to your blogspot control panel now.
Step 4
Install to your blogger template
Add one page element (Javascript/HTML) . I suggest you to leave title field blank, so the widget won't clutter your blog's appearance. The script should be stay invisible as it adds functionality/design on your comment form only, not enhance your blog's general look and feel.

Paste the code there on a 'content' field.
And there you go, you've successfully installed commentluv on your blog. ^^b But there is a thing you need to know. Here it is,
Step 5
Your js-kit settings
Now go to your comment form, and click "powered by jskit" hyperlink. It should take you on this page:
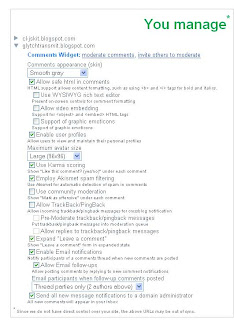 Here you can change many settings for your commentluv widget. I personally didn't change anything (before I removed my widget to experiment it on my other test blog) and was quite satisfied with commentluv.
If you'd like to uninstall commentluv, just upload your original template that was backed up during js-kit installation. Just restore your original template and blogspot will delete the commentluv widget automatically. Easy, huh? ^^
And that's the end of my tutorial. I hope you're able to make a good use of this great widget. If you have anything you'd like to speak, post it on my comment form here.
Author: http://eternalblackzero.blogspot.com/2008/10/how-to-install-commentluv-on-your.html